Basic
Instrument 3
Review & Simulation Exam
A compact review of Basic Instrument Flight and Basic Instrument Advance — then you fly: holding entries at KOMIT and the RNP approach into Halim, with tower clearances and weather you cannot see in advance.

How this exam works
Review
Section A: IFR helicopter rules in Indonesia (CASR 91, 135) and the holding rules. Section B: helicopter approach minima (CASR 97, 91.175), the chart and the tower. Section E: AW139 automation. Each closed by a 10-question quiz that mixes in Basic Instrument 1 and 2.
Fly
All in the AW139. Simulator C: three holding entries at KOMIT with the HDG knob. Simulator D: two RNP RWY 24 approaches — MFD flight plan, tower voice clearances, hidden weather, MDA decision, missed approach. Simulator F: the full AMBOY 1K arrival, KOMIT hold and ILS RWY 24 flown with the AW139 autopilot modes.
Pass
A failed entry or approach shows why and restarts you at the initial position. The instructor sees your attempts on the class monitor.
The AW139 instruments you will fly
Flight Mode Annunciator
FMA · top strip · lateral left, vertical rightThe FMA is the contract between you and the automation: green = what is flying the helicopter now, white = what is armed to take over. Lateral modes on the left, vertical modes on the right.
AP1 AP2engaged · LATHDG/LNAV/LOC(armed white, captured green) · VERTALT/ALTA/VS ±fpm/GS/GA.- Select a mode → verify it on the FMA → monitor the result on the tapes. A button that did not change the FMA did nothing.
- Simulator F reads the FMA:
ALTat the MDA,GSbefore the DA,GAafter TOGA,ALTAtoward 6,000.
Airspeed tape
IAS · 0 – 200 kt · AW139 limitsIndicated airspeed on a moving tape with the present value in the box. The coloured bands are the AW139 limits: VNE 167 red barber pole, Vmini 60 amber.
- Vmini 60 KIAS — minimum IFR speed: below it the AFCS is not approved, the amber band is the floor of every manoeuvre.
- Targets: holding ≤ 100 · Cat A final 90 – 100 · COPTER final ≤ 90 · missed approach 70 – 90 (Vy ≈ 80).
- Ground speed is shown below the tape; the IAS target from the GC selector appears as a cyan bug — GS × 5.3 gives the 3° rate of descent.
Attitude · flight director · RA
ADI · pitch ladder 5° · bank scale · FD cue magenta · radio altitude greenThe attitude director indicator: sky and ground, pitch ladder every 5°, bank scale at the top, the magenta flight-director cue showing what the AFCS commands, and the radio altitude (green) in the lower-left corner.
- Standard-rate bank ≈ 15 % of TAS + 5: 17° at 110 kt, 14° at 90 kt — the AP flies it; when hand-flying, keep the aircraft symbol in the cue.
- Pitch 3 – 5° nose-up at 90 – 100 kt level; a 3° approach is flown with ≈ 1° less pitch and the collective.
- RA (CASR 135.160) — height above the ground from the radio altimeter: the cross-check at the FAF (≈ 1,400 ft at OSETU) and the last word below 500 ft.
Altitude tape · QNH
baro altitude ft · ALT SEL cyan · MDA bug amber · QNH hPaBarometric altitude on a moving tape; the selected altitude (cyan) above the tape and as a bug, the MDA / DA bug (amber), the QNH window in hectopascals below.
- ALT SEL is the AFCS target: with VS or IAS selected,
ALTAarms and the AP levels there — set it before you start the climb or descent. - Set the MDA 620 (RNP) or DA 560 (ILS) before the FAF; the exam fails 60 ft below the minimum without a visual reference.
- 1 hPa ≈ 27 ft: set the QNH you read back to the tower — the altimeter and the RA should agree at the FAF (terrain ≈ 100 ft).
Vertical speed
VS column · fpm · + nose up · − nose down · scrollVertical speed in feet per minute on the column right of the altitude tape — tap + for nose up, − for nose down (±100 fpm, or scroll). On a 3° path the required rate is ground speed × 5.3.
- Intermediate segment KOMIT → OSETU 200 ft/NM ≈ 330 fpm at 100 kt; final 3° ≈ 480 fpm at 90 kt, 531 at 100 kt.
- Lead the level-off by 10 % of the VSI (50 ft at 500 fpm) — on the AP this is the ALTA capture.
- Go-around:
GAcommands +1,000 fpm; holding and cruise: 0 fpm withALTgreen.
HSI · lateral deviation
heading · bug cyan · track diamond magenta · course pointer · CDIThe horizontal situation indicator: present heading at the top, the cyan heading bug, the magenta track diamond, and the course pointer with the lateral deviation (CDI) for LNAV or the localizer.
- CDI full scale 1 NM en route, 0.3 NM on the RNP final, 2.5° on the localizer — one dot is half of that.
- Track diamond vs heading = drift: keep the diamond on the course, not the nose (wind 230 / 10 → crab left on 269° and on 245°).
- The course pointer slews to the active FPL leg automatically — during the hold it shows
HOLD INBD 269°/HOLD OUT 089°guidance.
Guidance controller
LAT · VERT · TOGA · IAS · HDG · ALT SEL · BARO · TMR · COM — live panelThe guidance controller as replicated in the simulators — and the PFD itself is the knob: scroll or drag the IAS tape, scroll the altitude tape for ALT SEL, drag the HSI rose to wind the heading bug, tap + / − on the VS column for nose up / down.
- LAT HDG / NAV / APP · VERT VS / ALT · TOGA on the top row; BARO · TMR · COM at the bottom. Select → verify on the FMA → monitor.
- Try it on the PFD at left: scroll the altitude tape to 3,000 → press VS → tap +: the FMA shows
VS +100 · ALTAand the tape climbs; drag the rose to the left: the bug moves and the helicopter banks left (double-tap the rose = SYNC).
Course map
Sources: FAA-H-8083-15B · FAA-H-8083-16B · AIM 5-3-8, 5-4 · CASR Part 91 & 97 · ICAO PANS-OPS (helicopter criteria) · AIP Indonesia WIHH AD 2.24 (STAR RNAV RWY 24, ADC) · AW139 RFM. The RNP approach used in the simulator is a training procedure built on the real KOMIT hold and runway data — not for navigation.
IFR helicopter in Indonesia
The rules first — CASR 91 and 135 as they apply to a helicopter under IFR in the Jakarta FIR — then the holding rules and the AW139 guidance controller you will fly them with.
The rulebook
Click a card for the detailed slide — or use → to go through all 6 in order.
Hierarchy & units
UU 1/2009 → CASR (PKPS) → AIP Indonesia → NOTAM → ATC clearance → RFM / OM. Indonesian units: ft, m/km, hPa, kt, NM.
- Order of authority: the Aviation Act (UU 1/2009) sits above the CASR; the AIP publishes how the CASR is applied at each aerodrome; NOTAMs amend the AIP; the ATC clearance is the instruction for this flight; the RFM and the Operations Manual bound what the helicopter and the operator may do.
- Altitude in feet, QNH in hectopascals (1 hPa ≈ 27 ft), visibility and RVR in metres / kilometres, speed in knots, distance in nautical miles.
- Wind in a METAR / TAF is ° true; wind passed by the tower or ATIS for take-off and landing is ° magnetic.
- Temperature in °C, cloud base in ft above aerodrome level, time in UTC (WIB = UTC + 7).
To fly IFR — 91.173 · 91.205
An IFR flight plan and an ATC clearance in controlled airspace, in an IFR-certified and IFR-equipped helicopter.
- 91.173: no IFR in controlled airspace without a filed IFR flight plan and an ATC clearance — in the Jakarta TMA this is Class C, so the clearance comes before the first IFR leg.
- Helicopter certification (CASR 27/29 Appendix B): stability augmentation or an autopilot, two attitude indicators, standby power for the attitude source, a stabilised cruise speed above Vmini.
- Equipment (91.205(d)): two-way radio and the navigation equipment for the route (VOR / GNSS, DME or RNAV), Mode S transponder, gyroscopic heading and attitude, sensitive altimeter, clock, rate-of-turn indicator, slip-skid, radio altimeter for offshore and HEMS.
- Pilot: instrument rating (H) current — six approaches, holding and tracking within the last six months (91.57 / CASR 61 recency).
Fuel — 91.167
Destination → alternate → 30 minutes at normal cruise. Helicopters carry a 30-minute final reserve; airplanes 45.
- Fuel to the destination, then to the alternate (if one is required), then 30 minutes at normal cruising speed — the IFR reserve for helicopters (CASR 91.167(a)(3), CASR 135.223).
- No alternate required (1-2-3 rule met) → destination + 30 minutes still applies.
- Holding fuel is added when the TAF shows TEMPO / PROB at the ETA, and contingency per the Operations Manual (typically 5 % of trip fuel).
- AW139 planning figure: ≈ 400 kg/h at 130 KIAS — 30 minutes ≈ 200 kg; the holding fuel at KOMIT for two patterns ≈ 55 kg.
Alternate — 91.169
1-2-3 rule at the destination; helicopter alternate minima: 200 ft above the approach minimum and 1.6 km, never below the approach minimum.
- 1-2-3: for 1 hour before to 1 hour after the ETA the forecast ceiling is at least 2,000 ft and the visibility at least 3 SM / 4.8 km → no alternate is required.
- Otherwise an alternate must be filed, and at the ETA at the alternate the forecast must be at least ceiling 200 ft above the minimum for the approach to be flown and visibility ≥ 1.6 km — but never less than the published minimum (CASR 91.169(c) helicopter).
- No instrument approach at the alternate → the ceiling and visibility must allow a descent from the MEA and a landing under VFR.
- The alternate must be within range of the fuel plan — it is not a wish, it is a place you can reach.
Altitudes — 91.177 · 91.179
Minimum IFR altitude: MEA / MOCA or 1,000 ft above the highest obstacle within 4 NM — 2,000 ft in mountainous terrain. Odd east, even west. Jakarta TA 11,000, TL FL130.
- 91.177: on an airway the MEA (or MOCA within 22 NM of the VOR); off-airway 1,000 ft above the highest obstacle within 4 NM of the route, 2,000 ft in designated mountainous areas (Java’s volcanic spine is one).
- 91.179 cruising levels by magnetic track: 000–179° odd thousands (3,000 · 5,000 · 7,000), 180–359° even (4,000 · 6,000) — the STAR altitudes you are cleared to override this.
- Jakarta TMA: transition altitude 11,000 ft, transition level FL130; below the TA fly on QNH — set the Halim QNH when Radar passes it.
- Radar vectors below the MVA are ATC’s responsibility; the minimum sector altitude (MSA) around HLM is your own safety net after a lost-comm or IIMC event.
Lost comm — 91.185
VMC → continue VFR and land. IMC → route A·V·E·F, altitude the highest of assigned / MEA / expected, squawk 7600, leave the fix at the EFC, start the approach at the ETA.
- VMC: remain VFR and land as soon as practicable — do not re-enter IMC to “complete” the clearance.
- IMC — route: Assigned, else Vectored (to the fix / route expected), else Expected in the clearance, else Filed.
- IMC — altitude: the highest of the last assigned altitude, the minimum IFR altitude for the segment, or the altitude ATC said to expect.
- Clearance limit: at a holding fix with an EFC time, leave the fix at the EFC; without one, leave at the ETA / filed arrival time and fly the approach. Squawk 7600, transmit blind on the last frequency and 121.5.
Operating IFR here
Click a card for the detailed slide — or use → to go through all 6 in order.
CASR 135 — commercial helicopter
Radio altimeter, approved autopilot for single-pilot IFR, destination weather before the approach, no known icing unless certified, 30-minute IFR reserve.
- 135.105: single-pilot IFR only with an approved three-axis autopilot (or SAS equivalent) — the AW139 four-axis AFCS qualifies; otherwise two pilots.
- 135.160: a radio altimeter for IFR and night operations; the RA readout is the green figure on the PFD attitude box.
- 135.225 — approach ban: the final approach may not be started unless the latest reported weather at the destination is at or above the landing minima.
- 135.227: no flight into known or forecast icing unless the helicopter is certified for it (the AW139 FIPS option); 135.223: 30-minute IFR fuel reserve.
Airspace — Jakarta FIR
Halim lies inside the Jakarta TMA (Class C). Same STAR, holding and ILS/RNP as the airliners — helicopter limits apply on top: hold ≤ 100 KIAS, COPTER final ≤ 90.
- Jakarta TMA — Class C from the CTR up to FL245: IFR separated from IFR and VFR, clearance required; Jakarta Approach / Radar 125.45, Halim Tower 123.05, ATIS 128.8.
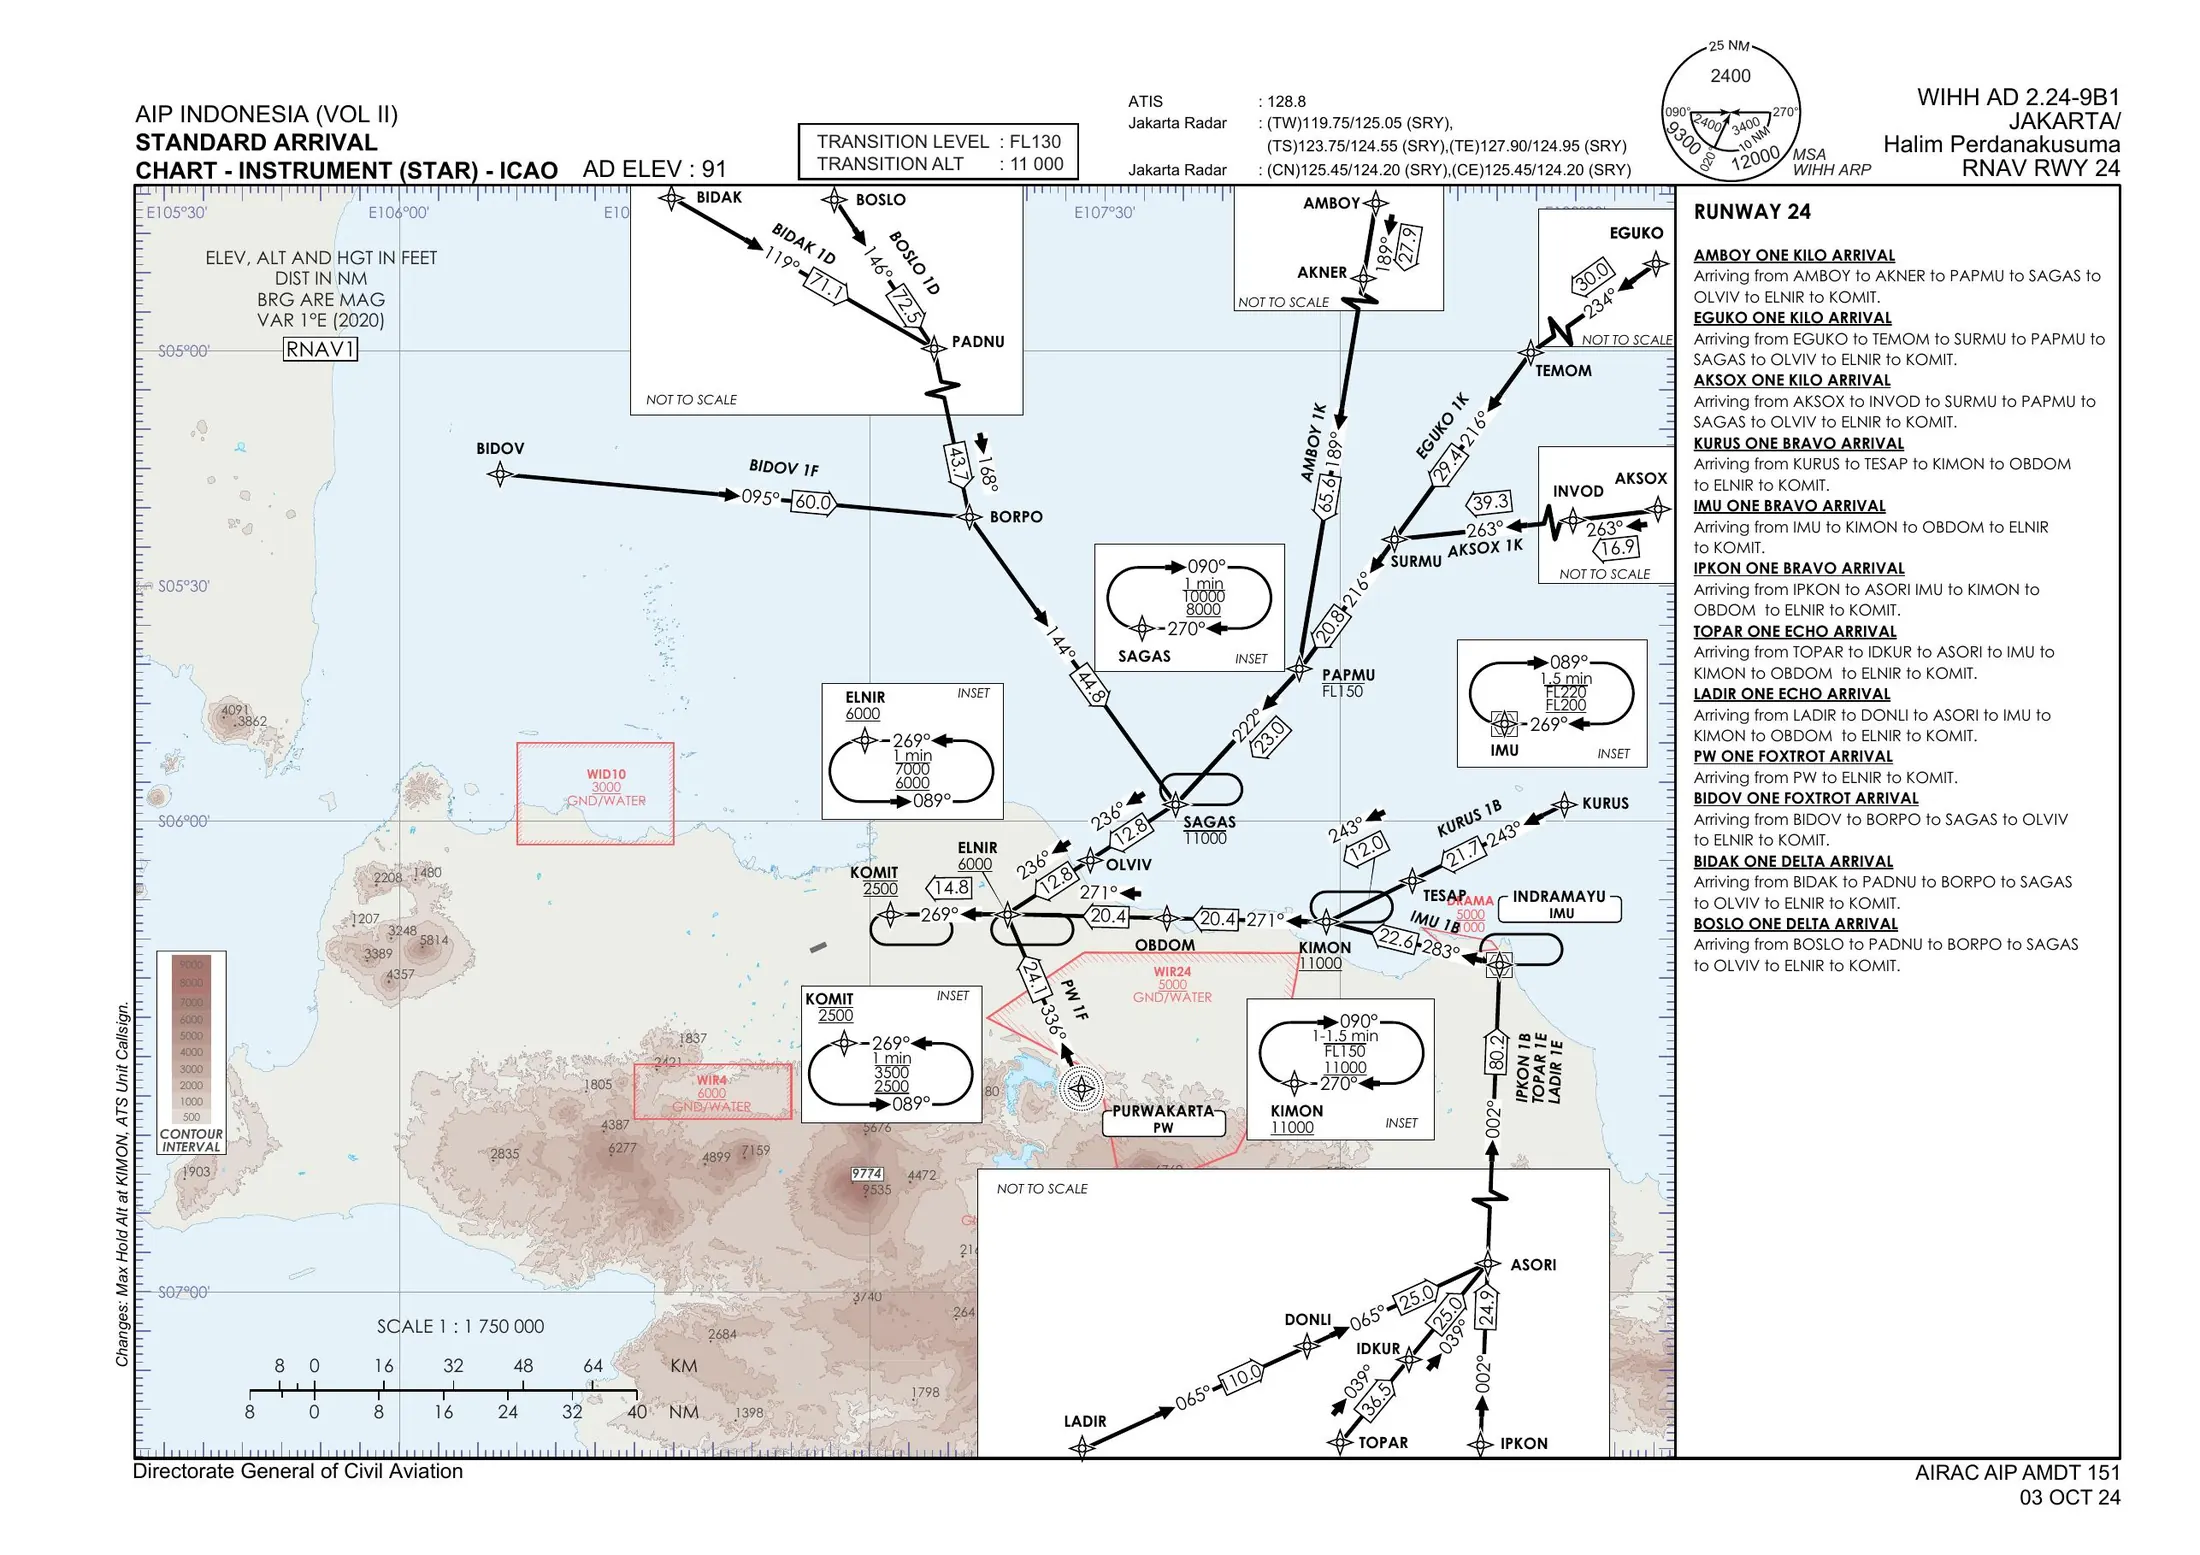
- Arrivals via the published STAR RNAV (AMBOY 1K from OLVIV → ELNIR → KOMIT) — the same procedure the airliners fly; ATC may limit speed, but the helicopter limits (ICAO PANS-OPS) are stricter and apply on top.
- Halim CTR Class C surface – 2,500 ft; Soekarno-Hatta CTR to the west; military areas (Atang Sendjaja, Pondok Cabe) — expect vectors, not the full STAR, when traffic is light.
- Helicopter IFR in Indonesia is mostly offshore (Jakarta FIR over the Java Sea, Balikpapan, Natuna) and HEMS / VIP; the procedures are the same, the heliports use PinS / ARA.
Weather products
METAR / TAF / SIGMET from BMKG — visibility and RVR in metres, cloud in ft, QNH in hPa. CB / TS always significant for a helicopter. Approach ban under Part 135.
- METAR WIHH every 30 minutes; TAF 24 h; SIGMET from the Jakarta MWO for TS, turbulence and volcanic ash — all BMKG products use ICAO units.
- Read the METAR in order: wind (° true) · visibility m · weather · cloud (ft AGL) · temperature / dew point · QNH hPa · trend.
- Tropical afternoons: TS / CB with 2–4 km in rain — plan the ETA, carry holding fuel, and brief the missed approach before the TS reaches the field.
- Approach ban (135.225): reported visibility below the minimum → do not start the final approach (hold or divert); once past the FAF with visibility deteriorating you may continue to minima.
Approach minima for helicopters
Cat A minima on an airplane procedure with the visibility reduced to one-half, not below 0.4 km. COPTER procedures as published. Offshore: ARA minima per the OM.
- CASR 97 copter rule: on a procedure designed for airplanes a helicopter uses Category A minima and may reduce the visibility to ½ of the Cat A value, but never below 0.4 km (¼ SM / RVR 1200 ft). MDA / DA unchanged.
- COPTER procedures (title COPTER RNP / COPTER ILS) are built for Cat H: minima as published, no further reduction, max 90 KIAS on final, 70 KIAS missed approach.
- ILS Cat I: DH 200 ft minimum — Halim ILS 24 OCA 560 (469); helicopter visibility 1,700 m → 850 m.
- Offshore: airborne radar approach (ARA) to the platform — MDH 200 ft, visibility 0.75 NM, minima per the OM; not covered by CASR 97 charts.
PinS & heliports
Point-in-space approaches end at a MAPt in space: “proceed VFR” or “proceed visually”. Hospital and offshore heliports in Indonesia use PinS / ARA, not ILS.
- A PinS approach (COPTER RNP) is flown like any RNP approach down to a MAPt in space — usually 0.5 – 2 NM from the heliport at an MDA ≈ 250–400 ft above it.
- “Proceed VFR”: from the MAPt continue under VFR — VFR weather minima for the class of airspace apply, obstacle clearance is the pilot’s responsibility.
- “Proceed visually”: a visual segment is published and obstacle-protected; the heliport (or the visual reference) must be in sight at the MAPt, visibility ≥ the chart value — typically 0.8 – 1.5 km.
- No reference at the MAPt → the missed approach is flown from the MAPt, not from the heliport. Offshore: ARA with the weather radar, MDH 200 ft, break-off at 0.75 NM.
IIMC & special VFR
Special VFR in a CTR: clear of cloud, visibility per the AIP, clearance required. Inadvertent IMC: Control · Climb · Course · Communicate — never descend to find VMC.
- Special VFR (helicopter): inside a control zone when the weather is below VMC — ATC clearance, clear of cloud with the surface in sight, visibility per AIP ENR 1.2 (helicopters may be cleared below 1,500 m when they can land safely if required).
- IIMC — Control: attitude on the PFD, wings level, engage the AP (ATT / SAS) — the AW139 upper modes are your first action, not the radio.
- Climb: VS + 500 or IAS mode, ALT SEL to the MSA (HLM sector) — climbing is always safer than descending into terrain.
- Course: HDG hold on the present heading or away from known terrain. Communicate: PAN-PAN, squawk, request vectors for an instrument approach — then fly the ILS you trained for.
Holding by the numbers
Click a card for the detailed slide — or use → to go through all 6 in order.
Speed & altitude block
Helicopter holding speed ≤ 100 KIAS up to 6,000 ft (170 above). KOMIT block 2,500–3,500 ft; never below Vmini 60.
- ICAO PANS-OPS helicopter holding: max 100 KIAS up to 6,000 ft, 170 KIAS above — the protected area is built for these speeds.
- You arrive at 110 KIAS: reduce before the fix, not in the entry turn — the exam reads the IAS at the moment you cross KOMIT.
- Altitude block at KOMIT: 2,500 – 3,500 ft (hold as published, maintain the cleared altitude); the exam fails 150 ft outside the limits.
- Lower limit of the speed window: Vmini 60 KIAS — the AW139 minimum IFR speed (amber band). In turbulence hold 90 rather than 100.
Standard-rate turn
3°/s: 180° in 1 minute, a racetrack with 1-minute legs takes 4 minutes. Bank ≈ 15 % of TAS + 5.
- Rate one = 3°/s → 180° in 60 s, 360° in 2 minutes; the AW139 AP in HDG mode turns at standard rate automatically.
- Bank for standard rate ≈ TAS ÷ 10 + 7 (or 15 % + 5): 17° at 110 kt, 14° at 90 kt — do not exceed 25° in the hold.
- Turn radius ≈ TAS ÷ 190 NM: ≈ 0.5 NM at 100 kt, so the pattern is about 1 NM wide and 1.8 NM long at 100 kt in no wind.
- Lead the roll-out by half the bank angle (≈ 8°) — on the AP you simply set the bug and watch the HSI.
Entry sectors — left-hand hold
Compare your heading to the fix with the holding course. Teardrop: 70° sector on the holding side (headings 089°–159°). Parallel: 110° on the non-holding side (339°–089°). Direct: the remaining 180° (159°–339°).
- Draw the 70° line through the fix: the outbound course (089°) rotated 70° toward the holding side (south). For KOMIT (left turns) it runs 159° / 339°; the holding course line 089° / 269° is the other boundary.
- Direct: headings to the fix from 159° through 269° to 339° — you arrive from the north, east or south-east, cross the fix and turn left straight onto the outbound leg.
- Teardrop (70° sector): cross the fix, fly 119° (30° into the holding side of 089°) for 1 minute, then turn LEFT to intercept 269° inbound.
- Parallel (110° sector): cross the fix, fly 089° on the non-holding side for 1 minute, then turn RIGHT (toward the holding side) through more than 180° back to the fix.
Timing the pattern
Start the timer abeam the fix. Outbound 1 minute below 14,000 ft; adjust the next outbound leg so the inbound leg is 1 minute.
- Timer START abeam the fix on the outbound turn — if you cannot tell when you are abeam, start it wings-level outbound.
- Outbound 1 minute (1½ minutes above 14,000 ft) — the exam accepts 30 – 125 s on the first pattern.
- Time the inbound leg from wings-level to the fix: longer than 1 minute → shorten the next outbound; shorter → lengthen it. Correct by the same number of seconds.
- With DME / GNSS: a distance-based pattern uses the published outbound distance instead of time — KOMIT is a timed pattern.
Wind correction
Crab into the wind inbound; triple that correction outbound — the turns are not corrected. Wind 230/12, inbound 269 → crab left inbound, ≈ 15° left outbound.
- Find the drift on the inbound leg from the track diamond vs the heading: wind 230 / 12 at 100 kt gives ≈ 5° left drift on 269°.
- Outbound: triple the inbound correction (≈ 15°) because the two turns are flown without correction and the wind pushes you through them.
- Head wind on the inbound leg → shorten the outbound time; tail wind inbound → lengthen it (≈ 1 s per knot per minute as a start).
- On the PFD the magenta track diamond shows drift directly: keep the diamond on the course, not the heading.
Protected area & the clearance
Stay inside 6 NM of KOMIT during the entry. Read back: “Hold at KOMIT as published, maintain 3,000, PK-VDE”. The EFC is your lost-comm exit time.
- The holding protected area for a 100-kt helicopter is small; the exam uses a 6 NM ring around KOMIT — leave it and the attempt fails.
- Clearance elements: fix · direction (as published = left) · inbound course · leg length / time · altitude · EFC — “as published” covers the first four.
- Read-back: fix, altitude, call sign — “Hold at KOMIT as published, maintain 3,000, expect further clearance 0810, PK-VDE”.
- Report entering the hold and the altitude; report leaving. Lost comm in the hold → leave at the EFC and fly the approach.
Select → verify → monitor
Click a card for the detailed slide — or use → to go through all 6 in order.
HDG — heading select
−10 / −1 / +1 / +10 or ← → (Shift = 10°). The AP turns at standard rate toward the bug — shortest way for ≤ 90°, otherwise the direction you turned the knob. SYNC = bug to present heading.
- Heading select is the lateral mode for the holding entry, the pattern, radar vectors and the missed-approach turn — FMA shows
HDGgreen. - Shortest way for bug changes up to 90°; for a 180° reversal the AP turns the way you moved the knob — wind the bug left through 180° for a left turn.
- Selecting the bug does not fly the aircraft until HDG is the active mode: in NAV the bug is only a reference; press HDG (LAT) to follow it.
- SYNC puts the bug on the present heading — use it before switching NAV → HDG so the aircraft does not turn away unexpectedly.
ALT SEL · VS · ALTA
Set the target in ALT SEL, press VS or NOSE UP/DN to start the climb or descent; ALTA (armed) captures the selected altitude and the FMA shows ALT.
- Sequence: ALT SEL (± 100 / ± 1,000) → verify the cyan figure on the altitude tape → VS (or NOSE UP / DN, ± 100 fpm) → FMA
VSgreen,ALTAwhite. - At ≈ 10 % of the VSI before the target the AP captures:
ALTA→ALTgreen, VS reference cleared. - NOSE DN while in ALT hold leaves the altitude — the AP changes to VS at −100 fpm; the exam counts this as a descent without a clearance.
- ALT SEL set below the current altitude with no VS selected does nothing — the AP needs a vertical mode to go there.
IAS selector
± 5 / ± 10 KIAS. Holding ≤ 100, COPTER final ≤ 90, missed approach 70–90, never below Vmini 60 (amber), VNE 167 (red).
- The IAS selector is the collective / IAS mode of the AW139 in this trainer: the AP holds the selected speed, the power index follows.
- Holding: ≤ 100 KIAS; Cat A / airplane procedure final: ≤ 100; COPTER final: ≤ 90; missed approach: 70 – 90 (best climb Vy ≈ 80).
- Vmini 60 KIAS — below it the AW139 is not IFR-approved (amber band on the tape); VNE 167 (red barber pole), lower with power-off or at altitude.
- Speed changes cost altitude: reduce speed before a descent is required, not during the level-off.
TMR · BARO · COM
Timer for the legs. BARO ± 1 hPa — set the QNH the tower gives you. COM 125.45 Jakarta Radar / 123.05 Halim Tower — clearances are spoken; choose the read-back and hear it go out.
- TMR: START abeam the fix, STOP wings-level inbound, RESET for the next leg; the readout is mirrored on the PFD.
- BARO: the altimeter reads ≈ 27 ft per hPa — the exam compares your BARO setting with the QNH you read back; tower QNH 1004 with 1011 still set = 190 ft too high indication.
- COM: Jakarta Radar 125.45 for the STAR and the hold; switch to Halim Tower 123.05 when Radar hands you off (“contact Halim Tower 123.05”) — calling the tower on the wrong frequency is scored.
- Radio voice: ATC speaks every clearance; the three read-back options are spoken when you choose — listen for the one with the complete elements.
PFD & MFD
PFD: FMA, speed tape, attitude with FD cue, altitude + RA, VSI, HSI with LNAV CDI. MFD: heading-up, own-ship centred, north arrow top-left, range 5–40 NM, FPL page, gold trail.
- PFD scan for the hold: FMA → HSI (heading / bug / track) → altitude → IAS → timer; for the approach: FMA → CDI / glideslope → altitude vs MDA / DA → RA.
- MFD heading-up: the top of the map is your heading; the north arrow (top-left) shows where north is. The magenta line is the active FPL leg, the racetrack and the missed-approach legs are drawn in position.
- Range 5 NM for the hold and final, 10–20 NM for the STAR; the FPL page is where Simulator D expects the checkpoints in order, then ACTIVATE.
- The gold trail shows your ground track — use it to check the entry and the wind correction after each turn.
TOGA · Chart · Hint · Restart
TOGA = go-around mode (+1,000 fpm, ALT SEL 6,000 for the missed approach to ELNIR). 📄 opens the AIP charts with your live position. Attempts are what the instructor sees.
- TOGA (collective switch): FMA
GA— wings level, +1,000 fpm, LAT reverts to HDG; set ALT SEL 6,000 and fly the published missed approach: direct GUKSA ≥ 1,000 → TAVUL → BESGU → ELNIR. - 📄 Chart: STAR RNAV RWY 24, SID, ADC, RNP RWY 24 and ILS RWY 24 (AIP) — your position and trail are drawn on the chart while you fly; click to zoom.
- 💡 Hint after a failure explains the expected entry or profile; it does not fly it for you.
- ↺ Restart returns you to the initial position; attempts are counted — first / second / three or more — and reported to the instructor’s monitor as the simulator score.
Section A quiz
Loading questions…
 Ten questions — rules, instruments, weather and helicopter IFR. Answer all to unlock section B.
Before the approach
Which minima a helicopter uses on Indonesian approach charts (CASR 97, 91.175), the RNP RWY 24 checkpoints and numbers, tower phraseology — and the real WIHH charts behind the KOMIT hold.
Which minima apply
Click a card for the detailed slide — or use → to go through all 6 in order.
Airplane procedure, helicopter crew
Use Cat A minima. Visibility may be reduced to one-half but not below 0.4 km; the MDA / DA does not change. RNP 24 LNAV 2.2 km → 1.1 km; ILS 24 1.7 km → 0.85 km.
- CASR 97 (as 14 CFR 97.3): a helicopter flying a procedure designed for airplanes uses Category A minima — speeds on final ≤ 100 KIAS keep you inside the Cat A protection.
- Visibility ½, floor 0.4 km (¼ SM, RVR 1200 ft): RNP RWY 24 LNAV 2,200 m → 1,100 m; ILS RWY 24 1,700 m → 850 m; LOC only 2,200 → 1,100.
- The MDA / DA is never reduced — the obstacle clearance height is the same for a helicopter.
- If the chart publishes Cat H minima (COPTER line), use those as published instead.
COPTER procedure
Designed for helicopters (Cat H): max 90 KIAS final, 70 KIAS missed approach, steeper gradients, smaller protected areas. Minima as published — no further reduction.
- Title
COPTER RNP/COPTER ILS/COPTER VOR: the procedure is built with ICAO PANS-OPS Vol. II Cat H criteria. - Speeds: initial / intermediate 120 KIAS, final 90 KIAS, missed approach 70 KIAS — fly faster and you leave the protected area.
- Descent gradients up to 6.5 % (≈ 3.7°) on final and PinS visual segments up to 12°; the missed approach climb gradient may be as high as 4.2 %.
- Minima as published — the visibility is already a helicopter value; the copter rule (½) applies only to airplane procedures.
91.175 — below MDA / DA
Only with all three: a position for a normal descent, flight visibility ≥ the minimum, and a visual reference. Approach lights alone: not below 100 ft above TDZE unless the red bars are visible.
- 1 · Position: continuously in a position from which a descent to landing can be made at a normal rate using normal manoeuvres — for a helicopter up to ≈ 12° is still normal.
- 2 · Flight visibility not less than the minimum on the chart (the helicopter value) — judged from the cockpit, not only the METAR.
- 3 · Visual reference: approach lights, threshold / markings / lights, REIL, PAPI, touchdown zone or lights, runway or runway lights.
- Approach lights only: descend to 100 ft above TDZE, no lower, unless the red terminating / side-row bars are distinctly visible.
- Any element lost below DA / MDA → go around immediately (91.175(e)).
MDA vs DA
MDA (RNP LNAV, VOR, NDB): level off, continue to the MAPt, missed approach from there. DA (ILS, LPV): decide at the altitude while descending — the aircraft dips slightly below.
- MDA — minimum descent altitude: a floor. Level at the MDA (lead the level-off by 10 % of the VSI), fly to the MAPt (RNP 24: the threshold), and go around at the MAPt if no reference.
- DA — decision altitude: a point on the glide path. At the DA you are already descending; “decide” means land or go around now — no level flight at the DA.
- Going below the DA during the go-around (≈ 30–50 ft) is expected and accounted for in the OCA; going below the MDA is not.
- A CDFA flies an MDA approach like a DA — add 50 ft (DDA) so the level-off never breaks the MDA.
Helicopter holding & speeds
ICAO PANS-OPS: hold at ≤ 100 KIAS up to 6,000 ft, 170 above; 1-minute legs below 14,000 ft. ILS / RNP final at 90 KIAS keeps the AW139 inside Cat A. Never below Vmini 60.
- Holding: 100 KIAS ≤ 6,000 ft, 170 KIAS above; legs 1 minute (1½ above 14,000 ft) — the KOMIT hold is published for airplanes at 230 KIAS; the helicopter flies the same racetrack slower and smaller.
- Approach categories: Cat A = VAT < 91 kt; the AW139 at 90–100 KIAS on final is flown as Cat A on airplane procedures, Cat H on COPTER procedures.
- Speed discipline is the obstacle protection: the turning areas on the missed approach are drawn for the category speed.
- Vmini 60 KIAS below any speed-reduction: in the hold do not slow below 80 in turbulence.
Missed approach for helicopters
Fly the published missed approach unless ATC instructs otherwise. The climb gradient is easy for a helicopter but speed and turn direction still matter — turn only after the charted altitude.
- Published missed approach RWY 24: climb straight ahead to GUKSA (at or above 1,000 ft) → turn left 155° to TAVUL → 089° BESGU → 059° ELNIR, climb to 6,000; hold at ELNIR if no further clearance.
- Minimum climb gradient 2.5 % (152 ft/NM); at 80 KIAS that is only ≈ 200 fpm — the AW139 go-around gives +1,000 fpm, so the turn point (GUKSA / 1,000 ft) is the limiting item, not the climb.
- Do not turn before the charted point or altitude — the protected area starts straight ahead; a premature turn is the classic helicopter missed-approach error.
- ATC may give an alternative missed approach (“climb runway heading 3,000, expect vectors”): comply, but if communication is lost fly the published one.
Chart → tower → MDA
Click a card for the detailed slide — or use → to go through all 6 in order.
Checkpoints — AIP RNP RWY 24
KOMIT IAF @2,500 → 245° 5.0 NM → OSETU FAF 1,500 → 3° 4.3 NM → RWY24 MAPt (MDA 620) → missed: GUKSA ≥ 1,000 → TAVUL → BESGU → ELNIR 6,000.
- KOMIT (IAF, end of every RWY 24 STAR) at 2,500 — turn onto 245°, descend to 1,500 by OSETU (200 ft/NM).
- OSETU (FAF) 1,500 ft, 4.3 NM from the threshold: configure, speed 90–100, timer if you want a back-up (2:35 at 100 kt).
- RWY24 MAPt at the threshold: at the MDA with no reference → missed approach from here, not earlier.
- Missed approach: GUKSA at or above 1,000 → left 155° TAVUL → 089° BESGU → 059° ELNIR, climb 6,000 — the FPL page must list these in order, then ACTIVATE.
Descent maths
KOMIT → OSETU: 1,000 ft over 5.0 NM = 200 ft/NM. Final 3° ≈ 318 ft/NM → fpm ≈ GS × 5.3. OSETU → RWY24 at 100 kt: 2:35. Lead the level-off by 10 % of the VSI.
- Intermediate segment: 2,500 → 1,500 over 5.0 NM = 200 ft/NM; at 100 kt GS ≈ 330 fpm — start down at KOMIT, not later.
- Final 3° (VPA): ≈ 318 ft/NM; rate of descent ≈ GS × 5.3 — 80 kt → 425 fpm, 90 kt → 480, 100 kt → 531 (the chart table says the same).
- Time FAF → MAPt 4.3 NM: 100 kt 2:35 · 90 kt 2:52 · 80 kt 3:14 — a back-up to the GNSS distance.
- Level-off lead = 10 % of the VSI: at 500 fpm start the level-off 50 ft above the MDA so you never go through it.
Minima for a helicopter — AIP
RNP RWY 24 LNAV: OCA 620 (529), vis 2,200 m → heli 1.1 km. LNAV/VNAV 480 (389) → 0.7 km. ILS RWY 24 Cat I OCA 560 (469), 1,700 m → 0.85 km. Never below 0.4 km. No circling.
- OCA(H) on the AIP chart is the obstacle clearance altitude (height above threshold) — the operator’s MDA / DA is at or above it; in this course MDA = OCA.
- RNP RWY 24: LNAV 620 (529) · 2,200 m with ALS → helicopter 1,100 m; LNAV/VNAV 480 (389) · 1,400 m → 700 m (not used in the sim, no VNAV).
- ILS RWY 24: Cat I 560 (469) · 1,700 m → 850 m; LOC-only 640 (549) · 2,200 m → 1,100 m.
- No circling minima for helicopters in this course (circling at 100 kt is Cat A anyway) and no reduction below the 400 m floor.
MDA vs DA — in the simulator
MDA 620 (LNAV): level off, fly to the MAPt at the threshold, go around there. DA 560 (ILS): decide on the glideslope, no level segment. 60 ft below the minimum without reference = fail.
- RNP (Simulator D): at 620 ft the AP must be in ALT — the simulator reads the FMA; descending through 560 without the runway in sight ends the attempt.
- ILS (Simulator F): on the glideslope through 560: runway + visibility ≥ 850 m + landing clearance → CONTINUE / LAND; otherwise TOGA at 560, the dip to ≈ 520 is accepted, 500 is not.
- Lead the level-off on the RNP: ALT SEL 620 is set before OSETU, the AP captures (ALTA) ≈ 50 ft above.
- A tower “go around” at any altitude overrides both: TOGA now, then read back.
QNH
1 hPa ≈ 27 ft. Tower passes 1004, altimeter still 1011 → it over-reads ≈ 190 ft: at indicated 520 you are at 330. The exam checks BARO against the QNH you read back.
- The altimeter shows altitude relative to the pressure set in the BARO window; 1 hPa ≈ 27 ft (30 ft rule of thumb).
- Setting too high (1011 set, QNH 1004): the altimeter over-reads by 7 × 27 ≈ 190 ft — you are lower than indicated: “high to low, look out below”.
- Set the QNH when you read it back, then cross-check: the RA at the FAF (OSETU) should read ≈ 1,500 − terrain ≈ 1,400 ft.
- Transition altitude 11,000: the STAR starts at 7,000 on QNH already — Radar passes the Halim QNH with the descent clearance.
Tower phrases
“Cleared to land” = landing clearance. “Continue approach, expect late landing clearance” = not a clearance. “Go around, I say again go around” = TOGA now, read back after. Read back runway, clearance, QNH and call sign.
- Check-in: “Halim Tower, PK-VDE, established ILS runway 24 (or: RNP runway 24), 6 miles” — the tower answers with wind, QNH and a clearance or “continue approach”.
- “Continue approach, expect late landing clearance”: you may continue to the minimum, but you may not land without the clearance — at the DA with no clearance: go around.
- “Cleared to land runway 24, wind 250 degrees 10 knots” → read back “cleared to land runway 24, PK-VDE”.
- Mandatory read-back items: runway, clearance (land / take-off / hold short), QNH, frequency, altitude — always with the call sign.
One look decides the entry
Nose-up picture: the sectors stay fixed relative to your heading, only the pointer moves. Next slide: the 360° dial on the real KOMIT / ELNIR geometry.
KOMIT — the pattern you will fly
Constraints: underline = at or above, overline = at or below, both = at. KOMIT @2500 is the end of every RWY 24 STAR. Approach briefing order: chart & date → navaid/course → frequencies → altitudes → minima → missed approach → airport → threats.
Section B quiz
Loading questions…
Ten questions — minima, charts, phraseology. Answer all to unlock the simulator.Holding entry at KOMIT
You arrive from three different directions. Radar clears you to hold at KOMIT as published: inbound 269°, left turns, 1 minute, 2,500–3,500 ft. Determine the entry, fly it with the heading knob and the timer, and get established inbound.
RNP approach RWY 24
From the KOMIT hold you are cleared for the Cat A RNP approach — flown in the AW139, so the published visibility 1.6 km may be halved to 0.8 km (CASR 97). Build the flight plan on the MFD from the chart, fly it in HDG with ALT SEL / VS, switch to Halim Tower, read back the clearance you actually hear — and at the MDA, land or go around. Two approaches, different weather and tower situations.
Automation for the ILS
NAV for the STAR, HDG for the hold, APP for the localizer and glideslope, ALTA for every level-off, GA for the missed approach. One slide of modes, a 5-question quiz, then Simulator F: the full arrival OLVIV → ELNIR → KOMIT hold → ILS RWY 24 Halim flown on the AW139 guidance controller.
Let the AP fly — you manage
Click a card for the detailed slide — or use → to go through all 6 in order.
LAT · NAV (LNAV)
Follows the FMS flight plan leg by leg (OLVIV → ELNIR → KOMIT) and sequences at each fix. FMA LNAV green. It does not fly the holding pattern on this training FMS — at the fix you take HDG.
- NAV couples the AP to the active FPL leg (magenta on the MFD): the CDI on the HSI shows the cross-track, full scale 1 NM en route, 0.3 NM on the RNP final.
- The FMS sequences to the next leg within 0.8 NM of the fix and turns onto the new course (fly-by); the FMA stays
LNAV. - No holding on this training FMS: at KOMIT press HDG (SYNC first) and fly the entry with the bug — the real AW139 FMS can fly the hold, the exam wants you to.
- NAV does nothing vertically: altitude constraints (ELNIR 6,000, KOMIT 2,500) are flown with ALT SEL + VS.
LAT · HDG
Turns to the heading bug at standard rate. Used for the holding entry and the pattern, radar vectors and the missed-approach turn. SYNC = bug to present heading.
- HDG is the mode for everything the FMS does not fly: the entry, the racetrack, vectors, the missed-approach turn to TAVUL if you prefer HDG over NAV.
- Before switching NAV → HDG press SYNC so the bug is on the present heading — then wind it to the outbound heading (089° for a direct entry at KOMIT).
- Turn direction for a reversal follows the knob; standard rate is automatic; roll-out is anticipated by the AP.
- HDG + ALT is the safe pair: whenever automation confuses you, HDG / ALT holds the helicopter straight and level while you sort it out.
LAT · APP (ILS)
Arms the localizer: HDG green + LOC white. Inside ≈ 2° LOC goes green and the AP tracks 245°. With LOC captured the glideslope arms (GS white) and captures from below at 2,500 (≈ 7.4 NM; FAP D6.0 at 2,000) — GS green, 3° to DA 560.
- Arm APP on the inbound leg (269°) before KOMIT, with the ILS IHAL 111.7 identified: FMA
HDGgreen,LOCwhite. - LOC capture: within ≈ 2° of the localizer the AP turns onto 245° and tracks it —
LOCgreen; the heading bug no longer matters. - GS capture from below: hold the platform altitude 2,500 in ALT; the glideslope comes down to you at ≈ 7.4 NM (FAP D6.0 at 2,000) —
GSgreen, the AP descends on 3° (≈ 480 fpm at 90 kt). - A GS capture from above is not allowed: if you are high, stay in ALT / VS until on the slope or go around. Intercept angle ≤ 30° for the localizer.
VERT · ALT / ALTA / VS / GS
ALT holds; VS climbs or descends at the reference; ALTA (white) = altitude capture armed, the AP levels at ALT SEL. On the glideslope ALT SEL is set to the missed-approach altitude 6,000.
- ALT (green): holds the altitude at the moment of engagement — the FMA label is the only proof you are level.
- VS (green) + ALTA (white): the AP flies the reference rate until the selected altitude, then captures; without ALTA the VS mode would fly through the target.
- GS (green): the glideslope replaces ALT / VS; the ALT SEL window is then free — set it to the missed-approach altitude 6,000 so TOGA + ALTA climbs to the right level.
- IAS mode holds speed with the collective; in the climb it is the safer mode (speed never decays).
GA (TOGA)
Go-around mode: wings level, +1,000 fpm, LAT reverts to HDG. Missed approach from the AIP chart: direct GUKSA (≥ 1,000), then NAV or HDG TAVUL 155° → BESGU 089° → ELNIR 059°, ALTA captures 6,000.
- TOGA on the collective: FMA
GAgreen, pitch for +1,000 fpm, wings level,ALTAwhite toward ALT SEL — which you set to 6,000 on the glideslope. - Lateral: GA reverts to HDG on the runway heading — fly straight to GUKSA (≥ 1,000 ft), then NAV (FPL: GUKSA → TAVUL → BESGU → ELNIR) or HDG 155° / 089° / 059°.
- Speed 70 – 90 KIAS (IAS mode 80 is ideal); do not exceed the Cat A missed-approach speed and do not turn before GUKSA.
- Report “going around, PK-VDE”; expect “climb 6,000, hold at ELNIR” or vectors for another approach.
IIMC — when automation saves you
Inadvertent IMC in VFR flight: attitude level, VS +500 / ALT SEL to the MSA, HDG hold, then PAN-PAN. The AP keeps the helicopter upright while you talk to Jakarta Radar and set up an ILS.
- Control: AP upper modes on — HDG (SYNC) + VS +500 or IAS 80 — within 5 seconds; the helicopter is now stable while you think.
- Climb: ALT SEL to the MSA for the sector (HLM 25 NM MSA, e.g. 4,000 / 6,000 toward the mountains) —
ALTAarmed; never descend to look for the ground. - Course: keep the heading or turn toward lower terrain / the sea; Communicate: PAN-PAN on 125.45 (or 121.5), squawk 7700 if required, request vectors for the ILS 24.
- Then fly the approach you trained for: NAV / vectors → APP → DA 560 — the same sequence as Simulator F.
AW139 automation
Loading questions…
Ten questions — AW139 modes, glass cockpit, IIMC — then you fly the whole arrival on the AP.STAR → hold → ILS RWY 24
AMBOY ONE KILO arrival from OLVIV at 7,000 ft: descend via the STAR in NAV, slow to 100 KIAS, hold at KOMIT in HDG (direct entry), then “cleared ILS approach runway 24”: APP, localizer and glideslope capture, Halim Tower, and the decision at DA 560 ft (AIP OCA 560/469). Two arrivals with different weather and tower situations.
Final check
Loading questions…
Final check — ten mixed questions from Parts 1, 2 and 3. Answer all to unlock the review.How was the exam?
Your rating helps the instructor improve. Give 1–5 stars for each aspect.
Loading…
Debrief. Then fly it for real.
Helicopter IFR: 30-min reserve, alternate +200 ft / 1.6 km, A·V·E·F, 7600. Hold ≤ 100 KIAS, Vmini 60.
Cat A chart → helicopter vis ½, floor 0.4 km: RNP 1.1 km, ILS 0.85 km. 1 hPa = 27 ft. KOMIT: 269°, left, 1 min, 2,500–3,500.
Entry by the 70° line: direct / teardrop (30° on the holding side) / parallel (then turn toward the pattern).
FPL from the AIP chart: KOMIT → OSETU 1500 → RWY24. Tower: “continue” ≠ cleared. MDA 620: runway + vis + clearance → land; else TOGA at RWY24.
AP: NAV for the STAR, HDG in the hold, APP for LOC/GS, DA 560. Missed: GUKSA → TAVUL → BESGU → ELNIR 6,000. A go-around is never wrong.